Connect to Cloudflare Gateway with Magic WAN
You can route traffic through Magic WAN and Cloudflare Gateway to secure Internet browsing and SaaS application access from internal users and devices.
In this tutorial, you will learn how to configure the Anycast GRE or IPsec tunnel on-ramp to Magic WAN, which connects to Cloudflare Gateway, from enterprise site routers.
Prerequisites
Before you can configure the Anycast GRE or IPsec tunnel on-ramp to Magic WAN, the following items should already be completed:
- Purchased Magic WAN and Gateway
- Added a root certificate
- Cloudflare created and provisioned Magic WAN and Gateway
- Received the Cloudflare GRE endpoint (Anycast IP address) assigned to Magic WAN
- Established connectivity between site edge routers and the Cloudflare GRE endpoint via the Internet or Cloudflare Network Interconnect (CNI)
- Use site routers that support Anycast GRE or IPsec tunnels and Policy-based Routing (PBR) so that specific Internet-bound traffic from the sites' private networks can be routed over the Anycast GRE or IPsec tunnel to Magic WAN, and subsequently Gateway, to enforce a user’s specific web access policies.
Proper routing techniques, such as policy-based routing, should also be utilized on the site routers to match relevant Internet-bound traffic from the site’s appropriate local private subnets and route them over the GRE tunnel to Cloudflare Magic WAN and Gateway for processing. Otherwise, such Internet-bound traffic would likely be routed straight out of the physical uplink of the site router without the protection enforced by Cloudflare Gateway.
Example scenario
For the purpose of this tutorial, setup will reference a scenario where an enterprise has three sites: headquarters, a branch office, and a data center. Each site has a local private network with RFC1918 address assignments:
- Headquarters is assigned a
192.168.0.0/16network, and Router A is the site router terminating the Anycast GRE or IPsec tunnel - Branch office is assigned
10.0.1.0/24network, and Router B is the site router terminating the Anycast GRE or IPsec tunnel - Data center is assigned with
172.16.0.0/12network, and Router C is the site router terminating the Anycast GRE or IPsec tunnel
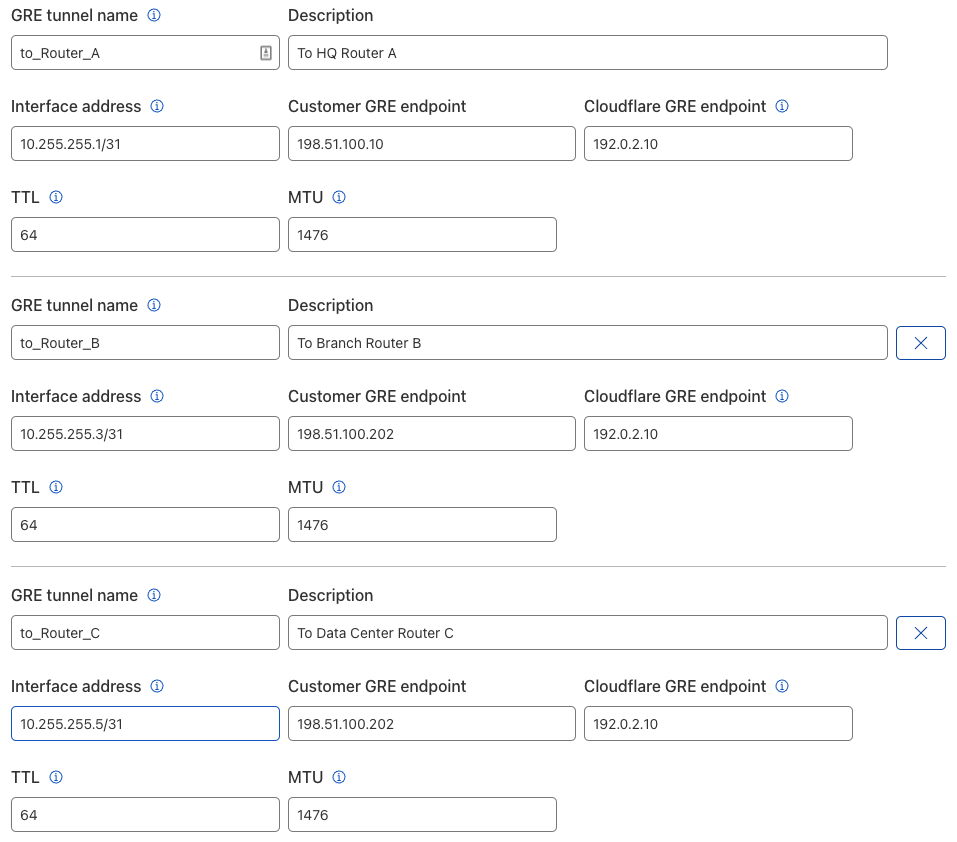
Each site’s private network has an on-ramp to Cloudflare’s Anycast network using Anycast GRE or IPsec tunnels, and the Cloudflare tunnel endpoint IP address is 192.0.2.10. The table below summarizes the Anycast GRE or IPsec tunnel configuration and route table entries for the Magic WAN topology.

Add Anycast GRE or IPsec tunnel
- Log in to your Cloudflare dashboard and select Magic Transit.
- Next to GRE tunnels and static routes configuration, click Configure.
- From GRE tunnels, click Create.
- On the Add GRE tunnels page, fill out the information for the Anycast GRE or IPsec tunnel.
- (Optional) We recommend you test your tunnel before officially adding it. To test the tunnel, click Test tunnels.
- To add multiple tunnels, click Add GRE tunnel for each new tunnel.
- When you are done, click Add tunnels.
In keeping with the example scenario, the list of tunnels should match the example below.

Add static routes
- From Magic Transit, click Static routes.
- On the Static Routes page, click Create to add a new route.
- Enter the information for your route.
- While optional, we highly recommend testing your route before adding it by clicking Test routes.
- If your test was successful, click Add routes when you are done.
In keeping with the example scenario, the list of static routes should match the example below.

Cloudflare Gateway configuration
After setting up the Anycast GRE and static routes, configure your Cloudflare Gateway policies from the Zero Trust dashboard. To set up the policies, refer to our Gateway documentation.
The Cloudflare Gateway upgrade supports all TCP and UDP ports, traffic sourced from RFC, and BYOIP.
After you have configured Cloudflare Gateway, enterprise users and devices from each of the sites mentioned in the example scenario will be able to safely browse or access Internet resources under the protection of the Cloudflare edge network.